Tuesday, December 27, 2011

Christmas Placemat Tutorial


 Spiritual -  Christmas time is the the most wonderful time of the year.  It is the time of the year that we celebrate the birth of our King - a King who came down from heaven to become one of us.  He came to live on this earth to show us how to live and love one another so that we would be able to live happily and with hearts full of charity, like His, forever and ever with Him.  Do we have to grow old and make many, many mistakes to finally "get it?"  That's how I  have learned just about everything.   Give us the grace, O Lord, this Christmas, to continually reflect on this truth and be thankful ... thankful enough to change.  We want to desperately.


Sewing -  We have a large round table that can seat 8+ people and placemats for this table need to be wedge-shaped so that they don't overlap when placed close enough to fit that many people.  I used a holiday polyester fabric on sale at JoAnn's and a thin layer of batting to pad them slightly.  Hope you enjoy this tutorial.

1.  You will need fabric of choice, light-weight batting, Steam-A-Seam 2, and thread to match.  I played around with different sizes and shapes of placemat patterns that would fit "my" table. I think I got 10 placemats out of 2 yards of 60" fabric.


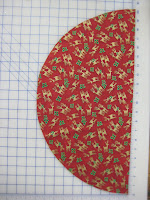
2.  I ended up with a pattern that was wedge-shaped that was to have a finished size with these measurements:  top 15", bottom 18", sides 12".

I ended up with the pattern on the left for the fabric and for the batting.
Note that I cut the "top" of the placemat on the "fold"  of the fabric to save sewing time.  Cut only 1 batting piece for each placemat.  All seam allowances were 1/2"


  3.  Place right sides together and place a single layer of batting on top.  Pin well to eliminate any pleats or unwanted folds under the batting.   
Notice that the single layer of batting is 1/2" shorter on the sides and bottom, but is even with the top.  That is because the top of the fabric was cut on the fold and will not have a seam allowance.


4.  I serged the two sides using a 4-thread wide overlock seam with a stitch width of 2.  This process sewed and trimmed the sides.  I opened the placemats and pressed the side seams flat so that when I would turn the placemats right side out it would help me to get the "knife-edge" seam that I wanted. 


5.  I sewed the bottom seam with my sewing machine leaving about a 2" opening in the center of the bottom seam.  I think sewing with the sewing machine is easier when leaving an opening and will leave a more even edge that that opening after turning the placemat right side out.  Press  the seam allowance flat as shown on the left.  Place a piece of Steam-A-Seam 2 on the seam allowance and press.  Being careful, turn the placemat right sides out.  Check the opening to make sure the edge is straight with the entire bottom before pressing closed.  Press the entire placemat well, making sure it has a "knife-edge" on all sides.  Top-stitch 1/4" all around the placemat.  Enjoy!


Tuesday, November 29, 2011

New Christmas Dinner Napkins Tutorial

Spiritual - "The Name of the Lord cometh from afar...I look from afar, and behold I see the power of God coming...   Go out to meet Him, and say, 'Tell us if You are He who shall rule...'"  Can you imagine the expectation of all who waited for their Savior to come the first time?  His coming was foretold by the prophets and the just longed to see their Messiah.  "The desire of old was sustained solely by hope, but it is now a confident desire, founded on the consoling reality of the Redemption already accomplished."    Each Advent our church (and each one of us) on a daily basis, commemorates this age-old expectation of the Redeemer.  This ritual is meant to arouse in us an "intimate, personal expectation of the renewed coming of Christ to our soul.  This coming is accomplished by grace; to the degree in which grace develops and matures in us, it becomes more copious, more penetrating, until it transforms the soul into an alter Christus"  Happy Advent to all!  Divine Intimacy


Sewing - Believe it or not, I cut these out "last" Christmas and never got to sew them. They are fun and easy to do, so I thought I'd do a tutorial for you.  I made mine semi-circular and really think they will do nicely as a dinner napkin.  I made 14.  You could easily adjust your pattern to make a full circle. 

Note:  It took one package of ric-rac to do three napkins.  These look really cute without trim and the time would be much shorter. Enjoy!  If you make some, please let me know!

1. To do 12-14, you will need 2 yards each of coordinating Christmas fabric, 5 packages of contrasting  ric-rak, one package of Steam-A-Seam2 double stick fusible tape, and matching thread.

 
2.  I made a quarter-round pattern that measured 10"  on each side and a 10" radius.  The pattern was placed on the fold so that I would get a semi-circle.  For each napkin, cut one of each of the two coordinating fabrics on the fold.


3.  Baste the ric-rac along the outer curved edge of one of the pieces of fabric.  Note that the sewing line will be  "slightly right" of the center of the ric-rac.

 
 4.  Place the coordinating pieces right sides together. Tug & pull until all sides & corners align well. Pin carefully.  Using your basting seam as a guide, sew a "needle width" to the left of the basting line all around the napkin.  Leave a three inch opening near one end on the straight side. Trim about half of the seam allowance all around the napkin EXCEPT the opening.  Leave the full seam allowance at the opening.  Press the napkin well before turning it right side out. 


5.  Turn the napkins right sides out.  Press extremely well, tugging on the ric-rac.  Make sure all edges are pressed to the seam edge.  Place a strip of the Steam-A-Seam2 in the opening on one of the seam allowances.  Press.  Peel the paper tape off.  Close the opening and press well.


6. Folding.  Make note that the "center fold" of the napkin is 1" off-center.

Fold left side to "off center" fold.
Turn napkin over.  Bring outside edges together.
Fold right side to meet left edge.
Turn napkin over & adjust if needed.


Wednesday, November 16, 2011

Many of you have asked for Audrie's muffin recipe she entered into the Yambilee Bake-Off.  Here it is!
Isn't she proud?  They are the best when they are still a little warm.  Enjoy!


SWEET POTATO SPICE CREAM MUFFINS
WITH BROWN SUGAR CRUMBLE TOPPING!
This recipe makes 12 cupcakes.

Cup Cake Batter:
1 cup sweet potatoes (about 1 pound, boiled and mashed)
1 cup flour
½ teaspoon baking powder
½ teaspoon coarse salt
1 teaspoon ground cinnamon
¼ teaspoon ground nutmeg
A pinch of finely ground mace
½ cup soften butter
½ cup sugar
        ½ cup brown sugar
2 eggs
1 teaspoon vanilla

Filling:  ***Make ahead.
4 ounces cream cheese, softened
½ cup powdered sugar
A pinch of finely ground mace
½   teaspoon cinnamon
1 ½ teaspoon vanilla


Crumb Topping:
½ cup brown sugar
½ cup white sugar
½ cup all purpose flour
½ teaspoon pumpkin pie spice
3 tablespoons unsalted butter, melted

1.      Filling:  combine cream cheese, powdered sugar, spices and vanilla in a small bowl and stir until blended and smooth.  Place mixture onto a piece of plastic wrap and shape the mixture into a log about 12 inches long.  Wrap tightly.  Freeze for at least three hours.
2.     Preheat oven to 350*F.  Place paper liners in a muffin pan. 

3.     Make the spice crumb topping.  Using a fork, combine the flour, brown sugar, spice, and melted butter in a small bowl. 

4.     Make the batter.
a.      In a bowl, with an electric mixer, whip together the butter and sugars until light and fluffy. Add the eggs, one at a time, beating until fully blended.  Beat in mashed sweet potatoes and vanilla.
b.      In a separate bowl, combine all dry ingredients – flour, baking powder, salt, cinnamon, nutmeg and mace. 
c.      Add the wet ingredients to the dry ingredients, and stir gently with a whisk just until completely combined.

5.     Cut the frozen spice cheese filling into 12 one-inch pieces.  Divide the batter evenly among the 12 muffin liners.  Press one piece of the spice cheese filling into the center of each muffin.  Sprinkle each muffin with the crumble topping and gently press the topping into the muffin batter.

6.     Bake the muffins for 20 minutes or until a toothpick inserted into the center of a muffin comes out clean.  Cool the muffins in the muffin pan for 5 minutes before removing them to a rack.  Cool completely.  Refrigerate leftovers … if there are any!


Monday, October 17, 2011

John-John or Jon-Jon? Tutorial on the Snap Tab

Spiritual -  Only the Holy Spirit can teach you to pray.  That gift is there for the asking.  I often use the expression, "Fake it till you make it!".  That works for almost everything I try from doing daily tasks cheerfully, accepting suffering, practicing forgiveness, and praying.  It is hard with all the "things" we have to do and the "stuff" that is on our minds to get away to a quiet spot and be alone with our Lord.  But, without prayer, we will not progress in our relationship with our Maker and with Charity.


Sewing -  I remember John F. Kennedy, Jr. standing at the side of his mother and sister saluting his father at the funeral of JFK.  He was wearing a John-John or Jon-Jon or jumper.  I thought he was dressed "just right" and have always spelled it as John-John since.   I made many of these darling little outfits for Liam.  My favorite go to pattern is "Holly & Hunter" by Bonnie Blue Designs.  This pattern contains sizes 6-24 months and 3-6 years.  The pattern is for a lined jumper and a jumpsuit in short and long versions.  It is a very versatile pattern.  The instructions are good and it has a very unique way of completing the lining process which makes lining the garment, IMHO, easy.   


Most patterns for jump suits for boys and girls instruct the sewer to make completed crotch snap tabs  before attaching them to the garment.  I  have never found that the finished crotch length and the snap tabs were the same lengths  when I tried to attach them.   Gggrrr!  So, this is what I do instead.  I hope you find it easier, too! 


1. Prepare crotch tab strips - Measure finished crotch length (CL).  Cut 2 strips of fabric   according to the following formula: 

CL + 2 "   X   2x   Snap Tape Width (STW) + 1/2".   

Ex.  CL = 4",  STW = 3/4", then strips would be  6" X 2/ 1/4"


2.  Adding Snap Tape -  Press each strip lengthwise in half to mark center.  On the right side of each strip, mark a line 1/4" from each long edge with a water soluble pen.  Cut a male & female piece of snap tape 1" longer than the finished crotch length.  Place a piece of snap tape on the right side of each tab strip between the halfway crease and the 1/4" mark.  One of these will be for the front and one of these will be for the back.  They must be complimentary.  


3. Front tab - Place the front tab strip to the crotch right sides together.  **Notice that the snap tape is on the lower side of the tab strip.  Sew a 1/4" seam.


4. Back tab - Place the back tab strip to the crotch right sides together.  **Notice that the snap tape is on the upper side of the tab strip.  Sew a 1/4" seam.


5. On the right side of each tab, mark a sewing line "one needle width" from the crotch edge. Mark another line 1/4" from that line and trim the remainder of fabric off.


 6.  One the wrong side of each tab, fold over 1/4" from the edge and press.


7. Turn the garment to the right side. Fold over tab at half way crease right sides together.  Stitch through all thicknesses 1/4" from both edges on sewing line,making sure to sew in a straight line.  Do this on both front and back.  Trim just short  of 1/8". 


8. Turn tabs inside out.  Press.  Stitch in place.  Press.

Back tab on wrong side


Back tab on right side

Front tab front right side

Copyright protected, 2011

Tuesday, October 11, 2011

Gigi's New Car Coat

Spiritual - "If God had not decreed that the Incarnation of His Son should take place in the womb of a virgin, we should never have had that masterpiece of grace and loveliness, the Most Blessed Virgin; we should never have had her smile or her maternal caresses.  Therefore, we love and honor Mary because she is the Mother of God, the Mother of Jesus;  and loving her in her relations to God, our devotion to her only makes our love for God, for Jesus, deeper and more tender."  Divine Intimacy


Sewing -  Gigi has a new car coat.  I got this fabric from Heirloom Creations last year.  I am smocking a bishop in a coordinating fabric and will be posting about that soon.  This fabric is a two sided quilted fabric. During construction of the coat, I carefully separated the two fabrics to the seam lines, sewed the right sides together (choosing the animal print as right side).  Then I turned under the seam allowance under on the geometric side and hand stitched it closed.  I did this with all internal seams, including the hood.  This made the entire coat reversible.  I added a bias trim on the outside edges to complete the little coat.  I used Children's Corner pattern "Casey".  I first saw this coat in Heirloom Creations as a sample made by Babs Martin.  It was so cute I knew Gigi had to have one. I couldn't remember the technique Babs used in constructing the seams, but I like what I did.  Thanks, Babs for the idea!


Monday, October 3, 2011

Martha's Windowpane Shirt

 Spiritual -  Divine wisdom, perfect knowledge of God, is also perfect knowledge of all that exists and all that will ever exist - there is no error in it because it is eternal and immutable truth.  Therefore, God knows  everything about us, the most secret movements of our hearts.  "Let us ask Him for the grace to know ourselves in His light, in His eternal truth."  Divine Mercy


Sewing - I saw this jacket on one of my instructors while taking a certification course at Martha Pullen's in Huntsville, Ala.  I knew I'd be making one.  This project begins with one of her windowpane shirts.  I chose several designs from the Baby Vintage II collection of embroidery designs to machine embroidery in some of the "windowpane" squares. and on the yoke back.  The rounded tail is cut off and about 6 inches of the cuff is cut off.  The edges of the newly squared bottom and three-quarter cuff are serged and a lace is sewn on.  The lace is 1 1/2 inches wide.

I have windowpane shirts  in several colors and the lace in the shop. This is a quick and fun project.  Martha has a summer one in which she embroider stick figures and embroidered her grandchildrens' names on each square - darling!

Friday, September 30, 2011

Family Reunion Dress for Gigi


Spiritual - How precious it is, Lord, to realize that you are thinking about me constantly... Ps. 139:17  Help me, Lord, to always remember my total dependence of You.
 
 Sewing -  This is the Family Reunion Dress by Oliver + s.  I started this dress for Gigi about 4 weeks ago and just completed it!  I am that busy - lessons, alterations, campaign parties, doctors, not to mention husband, child, and grandchildren!  Ahhh...the challenges of life.

Liesl Gibson, founder and premier designer of Oliver + s, uses a system of scissors on the envelope to denote the difficulty of the pattern. She gives this one a two.  As you can see on the website, her designs are unique .  Even the pattern envelope is different - they include a five-inch-high paper doll and outfit to match the dress.  They sell for $15.95, are multiple sized, and are available in the shop.

This dress has two options for embellishment - a tab and button, or,  the one I chose, a ruffle down the center.  It also features pintucked pleats at the front and back,  short sleeves, and several rows of top stitching at the hem.  It  buttons up the back and would be darling shortened to make a blouse.

Wednesday, September 7, 2011

The Bomber Cap

Spiritual -  Since Divine wisdom is a perfect knowledge of everything, there is nothing new it can learn because it sees everything in an eternal present.  "The very hairs of your head are numbered"  (Mt 10,30)  During prayer time this morning I read this from my favorite prayer book, Divine Intimacy,  "God knows us much better that we know ourselves; the most secret movements of our hearts, even those which escape our control, are perfectly manifest to Him.  Let us ask Him for the grace to know ourselves in His light, in His eternal truth."  A priest told me once, during confession, not to concentrate so much on my faults, but on my virtues.  This last line helped me to finally understand what he meant.  If I could only see myself in His light, in His eternal truth, I probably would love myself and others more and sin against myself and others less.  Thank you,  Holy Spirit, for that revelation.


Sewing -  I made the pattern for this little cap when Liam, now 7, was one years old.  It was a cross between an antique pattern and a cap from a box of family heirlooms.  I've been wanting to produce a pattern of this cap, but needed to make sure I had the proper sizing  for today's child. I have been making and selling this cap for several years and I think I have the sizing down for a pattern.  Maybe soon. The chin strap and folded brim reminds me the leather "bomber's" cap of the old war movies.   The first one I made was navy corduroy and I made a double breasted jacket to go with it.  Liam was so adorable in it and wore it for 2 years.  I'll have to put it in the shop til the next grandson comes along. 

All Designs Are Copyright Protected copyright 2011